The Bullet Blender® is a very durable piece of equipment. It is unlikely you will ever need to troubleshoot your instrument. If you do find yourself in need of assistance, please feel free to contact us at [email protected] or follow these troubleshooting steps below:
Reference Manual with helpful suggestions and pictures
If the has Bullet Blender stopped prematurely and will not restart…
The Bullet Blender contains a thermal fuse which prevents the device from overheating. Wait a little while, and when it cools off, you will be able to restart it.
If the Bullet Blender will not start…
Make sure the unit is plugged in. Check your electrical connection.
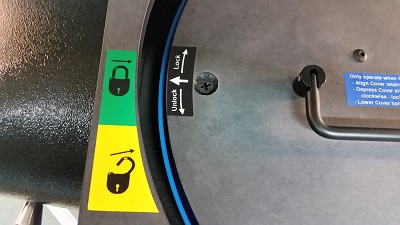
If a Bullet Blender Gold has power, and, the fan runs, but samples won’t homogenize…
If you can hear the fan start, but not the motor, the lid safety interlock might not be engaged. The small white arrow on the lid should be pointing directly toward the green “locked” symbol (see photo).
If you require assistance in diagnosing the problem, please call us at +1 (518) 674-3510, or write us at [email protected]. We’re always happy to help.
If the lids of the tubes open or leak during operation of the Bullet Blender…
Make sure the tops of your tubes are securely fastened. Try to ensure that the interface regions or screw threads between the lids and the caps are dry when you close the caps or screw them on, so that there is enough friction for the caps to remain tightly sealed. For best results with the Bullet Blender, we recommend using the specific tubes based on the model you have. Please see the Bullet Blender FAQ to identify the best tube for your instrument.
If the centrifuge tubes broke…
Use only high-quality polypropylene centrifuge tubes. Even high quality tubes may become brittle when exposed to extremely low temperatures. Use caution when using liquid-nitrogen supercooled samples to ensure that you are not supercooling your microcentrifuge tubes as well.
If samples aren’t fully homogenizing…
The first and easiest solution to any difficulties in homogenization is to rerun the samples at a higher speed (if not already at the maximum speed) or for a second cycle of half the original time. In general, if you have further problems homogenizing a sample, the issue is usually the bead:buffer:sample ratio. Most samples will be fully homogenized at a sample:bead volumetric ratio of 1:1 though you can have more beads than sample if you wish. Also make sure that you are using a 1:2, bead:buffer volumetric ratio. An excess of buffer may minimize bead-sample collisions and effect homogenization efficiency. You can also try using denser beads, or changing the bead size. Harder tissue will often require denser, larger beads.
If the samples float in the buffer, and do not homogenize…
Push your samples as far down in the microcentrifuge tubes as possible with a pipette, forceps, or a similar tool. Place your beads evenly on top of the sample to prevent it from floating when you add your buffer. The beads should be of sufficient mass and density to weigh your sample down. If not, try increasing the amount of beads or decreasing the amount of sample until the beads successfully weigh down the sample.
If the tissue is fibrous, and does not homogenize well…
Fibrous tissue will always be difficult to homogenize. Increase the time and the speed of the homogenization, and if you still have difficulty homogenizing the tissue, try using denser beads, using more beads, or adding less sample per tube. The “UFO” beads have proven effective on fibrous tissue. Use the SSUFO35 beads in microcentrifuge tubes or SSUFO56 for 5 mL and 50 mL tubes.
If you are using a kit, and the kit calls for a different amount of buffer than the Bullet Blender homogenization protocol…
There are three typical options you can choose from to comply with both requirements:
- Use the buffer volume recommended for use with the Bullet Blender (2 volumes of buffer for every 1 volume of sample) then add the rest of the buffer afterward.
- Use the volume of buffer recommended in the kit and adjust the volume of beads accordingly (2 volumes of buffer for every 1 volume of beads).
- A combination of the two options above. For example a protocol may require a sample:buffer volume ratio of 1:10. If your sample is 100mg and you are using a microcentrifuge tube, then it is not possible to fit all of the required material in the tube (100µL of sample, 1 mL of buffer and 500µL of beads). Instead, homogenize your sample in 400µL of buffer with 200µL of beads. After this is complete, add the additional 600µL of buffer to the tube (tube now contains 100µL of sample, 1 mL of buffer and 200µL of beads – it fits!). Shake and allow to stand for a few minutes before continuing with extraction.
If your sample is smaller than the minimum sample size (10mg / 10µL for the Bullet Blender standard, 50 mg / 50 µL for the Bullet Blender 5, 0.1 g / 0.1 mL for the Bullet Blender 50)…
Depending on the requirements of your downstream application, you may still be able to use the Bullet Blender with samples smaller than the minimum recommended size. Use your desired buffer volume with 1/2 that volume of beads. Never use less than 25 µL of beads and 50 µL of buffer in the Bullet Blender standard, 100 µL of beads and 200 µL of buffer in the Bullet Blender 5, or 250 µL of beads and 500 µL of buffer in the Bullet Blender 50 regardless of how small your sample may be.